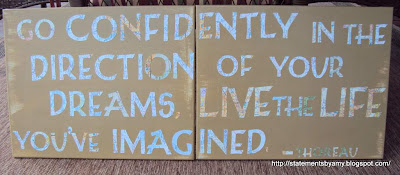
For a while now, I have had the urge to redo R's room. On one wall, there is a large map and the color of his room is navy blue. It was not hard to come up with a theme--travel, adventure, water. I was not really wanting to go all nautical, but more like pieces that could be about more than one idea.
So I began looking for wall art for the area above the bed. I wanted something sorta big but not too overwhelming. I was not able to find anything that I liked so I thought that I could just come up with something on my own. I bought 2 16 x 20 canvas and went to work.
My first thought was that I would just make the canvas a solid color and have one word across the canvas.
This is what it looked like (sorry the photo is so dark, this is where all things messy with paint happen in our home and the lighting is not good).
And I HATED it! I used oil based red paint to paint the letters on and I was like "what am I going to do now?". So it sat, for like a couple of weeks till I finally thought of something! Since the theme is travel, adventure; I thought about a map art with a twist. :)
I picked up a map at Target and found a quote online that I loved and thought that the combination would be perfect for his room.As a test to see if the quote would fit on my canvas I cut out the letters in plain cardstock with my Cricut and laid them out to see how it would look.
Awesome! They all fit and my vision of the finished product rocked in my head so I kept going!
I had to paint over the word DISCOVER (and that word was not a good choice in the beginning because my husband too one look at it and said "Disc Over". I was not able to get that out of my head and to be honest that was the first thing I thought when I looked at it too!) Anyway 2 coats of Kilz later and this is what it looked like
As you can see the red was still visible. So I had to come up with a background first and so I used a color that we had left over from another room so I thought that I would use it instead of buying more paint. I painted the canvas with 2 coats of the leftover light brown paint. And let it dry.
In the meantime, I got my map and cut out sections that I wanted to use and with my Cricut, I cut out each letter. Again.
After all the letters were cut and the paint was dried, the letters were arranged in order on the canvas, it looked like this
Side Note: I used old picture frames (from an idea that I have not tackled yet) under my canvas to elevate it so it would not be laying directly on my table and allowed the paint and later the glue to dry on the sides.
After all the letters were arranged to my liking, I glued all the letters down one by one with Mod Podge (LOVE that stuff!). Then when all the letters were glued down I went back over both with another layer of Mod Podge, it gave it a glossy look which I love!
And the finished product:
What do you think?
Although it took a while to figure out what I was going to do, but when I did, it all came together nicely!


No comments:
Post a Comment