Showing posts with label diy. Show all posts

Tuesday, April 1, 2014

Coat Closet Transformation

I cannot tell you just how excited I am to FINALLY be able to show this to you! This has been one transformation that I am so glad we did and it has made a huge impact! It is now the perfect spot for coats and backpacks!


Let me start at the beginning.

You see we have 3 doors all in one area, we knew when we built that this would potentially be an issue at some point.....The door that is opened is the coat closet. See, this is NO FUN in the mornings when it is time to get your coats out and put them on while in a hurry to get the kids to school on time. Plus the kids would hang their backpacks on the door knobs so each time you walked by you would get hit in the leg by the backpacks, again NO FUN. The door directly in front leads to the garage. See..it just doesn't work!


So I took the door off. Then propped it against the pantry door for 2 days. I took the door off to see if I could live with it being off and just to get a feel of how it would be without a door before I went in and completely got ahead of myself and transformed the closet only to realize that removing the door was a mistake. Am I the only one that over thinks my diy projects? Well, then the Mr. got in on the action. He wanted in on the fun too you see. Little did he know that I already had a plan as to what I wanted the new closet to look like. Well, he started looking online and found a few photos he liked and together we came up with a better functioning closet.

The closet looked like this:

See coats, bags, beach towels, extra towels, boxes where I stored other bags and another box for mittens/hats/gloves and a shoe shinning kit. There is a lot in here but all that space underneath was being wasted! Well, it was where the dog and cat food could be found.

 
I started off doing a little measuring just to make sure I got it all correctly spaced out.

 
Thank goodness the Mr. got involved! Together, we decided we wanted the board and batten/cottage look with a shelf on top and a bench underneath.  We purchased all of our supplies at Lowes. Came home and got busy!
 
First, the shelf on the top:
 
 
If you notice we changed out the shelf completely. The builder used MDF board for the shelf and it just didn't fit the look we were going for, so we took it out and replaced it with real wood. Then we added a piece of wood in front just below the shelf to hide the hanging rail. We knew we were not going to be hanging anything on it, since we were unable to remove it, we hid it.
 
Next we worked on the bench, we used the same measurements as our shelf to complete the bench. Just make sure your bench is sturdy, has support and that it is nailed to the studs.
 
Then we began on the middle area. We made sure all of our boards would be evenly spaced before we nailed them to the wall. 
 
 
Once it was all completed, we painted the closet white. The closet was big when you got in there but the green walls made it feel so dark and I knew the white would make it feel more open.
 
 
See, so much brighter!! We added hooks to finish the look.


This is the perfect spot for coats and backpacks!
 
Now, I had to add pretty baskets too! And pillows! You can read about my pillows here.
 
 
The baskets are for gloves, hats, etc; pet items and extra towels.
 
 
We even added a small hook on each side.


The small hooks are great for hats and dog leashes.
 
This project turned out great! It is so much easier to get the kids coats and backpacks and head straight out the door, no more fussing, pushing, closing the door on someone hassle!
 
As you can see from the close ups, we left the areas where the original door hung unfilled. I just painted over it but when we do another project soon we will fill those areas in and give that a more finished look.
 
How about a before and after? Yes, sure!
 
Before:
 
 
After:


Thanks for stopping by!
 
Linking up to The Lilypad CottageLiz Marie


Monday, December 9, 2013

DIY Christmas Star & Wall Art

For my Christmas Mantle, I wanted to add a little something crafty...

You can see my Christmas Mantle here.

I began by cutting pieces of quarter round floor molding into equal sizes. Then I used my hot glue gun to glue the pieces together and let it dry overnight. I cut strips of burlap and then used my hot glue gun to glue the burlap onto the wood. I wrapped the burlap around the wood and glued it into place.

One little tip of advice....be careful not to burn yourself, that is all I have to say about that!

I wanted the star to hang, so I used fishing line. Using a small piece of fishing line, I looped it around the point at the top of the star and tied in a knot then in another knot to make sure it was secure. Then, I looked for a rock that stuck out a little for me to "hook" my fishing line onto. (This is the reason the star is off center and the reason I had to make the art below for balance). In my head it looked a little different from what I had thought to begin with but I just went with the flow, I mean lets be real, there is no way I am putting a nail in that rock!


For the word art, I had a canvas that I had not used for anything yet and it worked perfect. I believe the size was 16x19. First, I had to prime the canvas because for some crazy reason I had painted it blue...then let it dry overnight. I printed the words out with my printer, cut them out and then glued the letters onto the canvas.
I took a step back and thought to myself  that it could use a little sparkle. So I added glitter to the word JOY.  Took another step back and thought it needed a little more sparkle. I had some red glitter spray paint left over from a while back and thought I would just spray the entire canvas. It looked great until the can ran out and only blew out air....see the top right corner.......but that is our little secret..ok? Then I did a layer of glitter spray paint sealer over the canvas to seal the deal ;)

Hope your weekend was great!

Friday, December 6, 2013

Christmas Mantle

Sorry for the less than perfect photo, not sure what was happening but it didn't matter what I did the photo looked "foggy."

Anyway, this year I wanted a little different look.  The garland, lantern and trees are the same decor that I used last year. I added the star and word art.

I made this, so easy! As soon as the Mr. saw it he was like "how is that hanging up there?"

Made this too, again so easy. I got a little lazy on this one.

I'll be back next time to share how I did these easy projects!

Friday, October 18, 2013

Pumpkin Makeover

A while back I completed my Fall Mantel and I painted these cute pumpkins white. At first, I loved the pretty fresh pumpkins, but then it changed. I kept thinking it needs something more, more color, a little sparkle, something!

So I decided gold was it. More gold! My original thought was glitter, but I wasn't in the mood to go all out messy plus finding a can of the glitter spray paint in town is out of the question, so I remembered that I had some leftover ribbon from a past project I worked on and so I used it to tie around the largest pumpkin. Then I remembered I had gold paint so I thought polka-dots would be good. The easiest way to get good circles on the pumpkin was to use these great small circular foam pouncers. Quick, fast and easy clean up. My kinda craft!


On another pumpkin I added washi tape around the middle to add some black. I just love the color black and cannot help it!


And more photos!


Much better, don't you think?!


Monday, September 16, 2013

Flower Pot Re-do

Every time I walked by these pitiful flower pots, they just begged for me to change them, make them pretty. So I did.

I started with this.. yep, one even has a chip. Oh well, I carried on...


I went to Lowes and picked out Valspar Outdoor Color Spray Paint in Satin Honeywood. Pretty, yellow, happy color. I gave both pots 2 coats of spray paint. On the smaller pot I used a stencil to add a design and on the larger one I added glitter paint at the top. The stencil design and the stripe were painted using Martha Stewart Crafts Multi Surface Glitter Acrylic Craft Paint in Golden Beryl.

Next, I had to purchase cute flowers to go into the pots. Back to Lowes I went and purchased 2 potted plants, came home and instead of planting them immediately into the pots, I sat them on the side of our house under the dryer vent. Well, let me tell you now that sticking your potted plants under the dryer vent in summer is not a good idea. Add that to the fact that I totally forgot about them until we were outside playing and our little guy took it upon himself to urinate beside my plants and then he informed me that my plants had been "watered"!!! What is it with boys having to go to outside?!

In the trash they go!!!

Back to purchase more plants. This time I purchased mums.

I planted them immediately in my cute little pots.

Doesn't that stencil look darling? Here is a closer look.
 
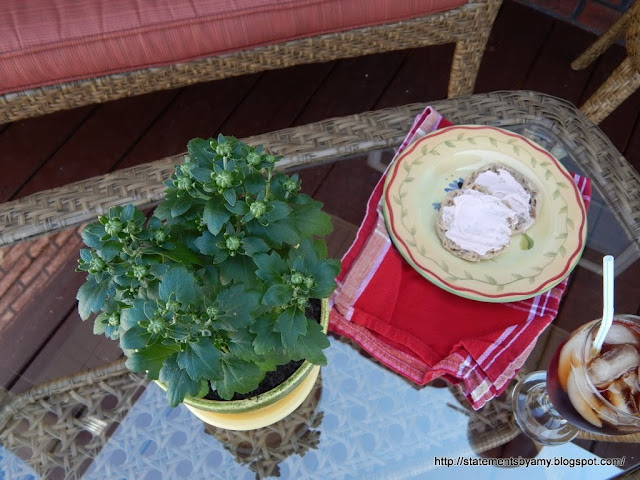
This now makes the perfect spot for a relaxing morning snack.


I just love how the glitter stripe looks, gotta add a little bling!

This was the first time I have used the glitter paint, I used 2 coats to make sure I got the coverage I wanted.

This was such an easy way to transform these ugly unused pots. At first I thought these would just be used for summer and then I would put them away but now I am sure I am going to leave them out during fall as well.

Linking up with Savy Southern Style and Liz Marie Blog.

Monday, September 9, 2013

DIY Chalkboard

There is a large wall that needed a little something in the kids play area. While I wanted something "kid like" yet still adult friendly and usable after the kids get older it also had to be fun for everyone.

So my solution....a chalkboard!!


First, I measured the area and decided on the perfect size. We purchased chalkboard paint and molding of our choice from Lowes. 

Here is the photo after 2 coats of chalkboard paint.
After allowing it to dry completely  we then moved on to framing our chalkboard. The Mr.  used a miter saw to cut the edges. We chose several different moldings, the top and sides are the same but for the bottom I wanted a piece a little different. I wanted the chalk to be able to sit in the bottom like a real chalkboard. In order to do that the larger flat peice in the bottom photo went on the bottom first. Then the top decorative molding went on top of the flat peice slightly higher and level with the side molding. This allows a gap to hold the chalk.

Once the molding was nailed into place, we used caulk to finish off the corners at the bottom (where the different moldings meet) to give it a more finished look and to keep chalk dust from getting into the cracks.

 The chalkboard (black area) measures 7&1/2ft x 5ft. This is fun for the kids and for the adults now but even when the kids grow up and this area is no longer a kids area this chalkboard will still work in a new design.  Now I just need to finish the rest of the kids play area! Any ideas?

Linking up to Savy Southern Style and Liz Marie Blog


Monday, August 12, 2013

DIY Rope Vase


It seems that rope wrapped glass has been popping up everywhere. At first I thought that this was something that I would just purchase, but after seeing the product I knew that this was something that I could do myself and save a bundle!

The first time I tried it on a different project, it did not go so well, the rope would not stick to the wood and needless to say it all went in the trash.

So I decided to try it again, this time on glass and the outcome was fabulous! I began with a vase that was given to me by the Mr. on a past special occasion full of pretty flowers. I am just so glad that I kept this vase because I loved how I transformed it into something that I can now leave out and enjoy.
 I began by finding my starting point and using E6000 glue to adhere the start of my rope. I used rope purchased at Lowes from a while back. Then I used my hot glue gun to reinforce the start then periodically glued the rope as I wrapped it around the vase till I got to the bottom. Once at the bottom I let the vase sit overnight to make sure the glue was dry then cut the rope.

I am so happy, now I just have to decide where to put it!!


Have you tried this before?

Linking up to House of Hempworths. andSavvy Southern Style and Liz Marie Blog

Tuesday, June 4, 2013

Lamp Re-do & Big Boy Room

 
When trying to get our oldest son's room a new grown up  fresh look I changed up most items in his room except this lamp. It sat there so plain and well blue. It needed something and so without really thinking alot into it, I gathered some fabric glue, burlap and twine.


I brushed fabric glue over then shade then covered it in burlap. I cut off the excess and then added a twine trim around the top  and bottom of the shade.

Viola! A new look in no time!


After looking at this for over a month now I think I may paint the base red........

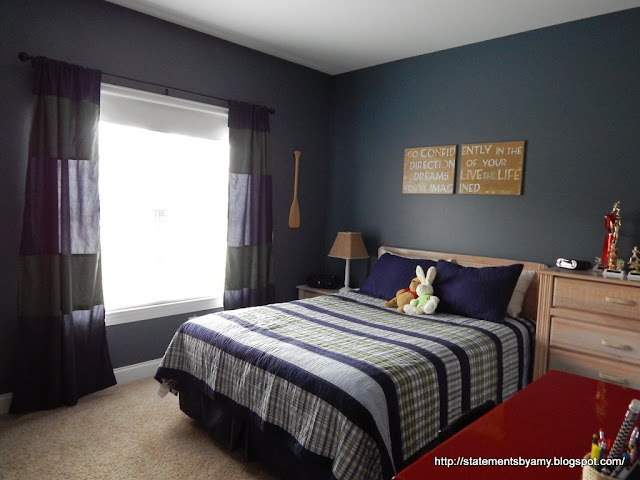
Here is what the big boy bedroom looks like


There is a large dresser with mirror on the wall on the far left of the photo(that you cannot see).
 
The DIY Wall Art  can be found here.
The DIYCurtain Panels can be found here.
The bedding is from Pottery Barn Kids.
The red desk is a DIY that my husband completed a while ago.
The DIY Pencil Holders on the desk.
 
What do you think?
 
Linking up to Liz Marie Blog.


Tuesday, April 2, 2013

DIY Family Notebook


Several months ago I realized that there were to many papers in different areas of our home that needed to be organized in some way, a way that worked for us  me. I had seen in different places around the Internet that some moms had come up with their own family organizer. Some were very detailed and some were not.  Some blogs offered free template downloads or you could purchase the templates for a fee and some just did not go with our lifestyle and some of the content was just to detailed for me to keep up with. I need something simple and easy otherwise it will not be kept up to date and a waste of time for me to have put together in the first place. So I started putting together information that I knew I needed and wanted to include and as a few months passed by, I found other items that needed to be included too.
 
This is something that works for me, it may not work for others but it has helped me contain papers and notes that may end up lost in a drawer somewhere.
 
Here is what I came up with.
 
I started with a 3 ring notebook from Target and page protectors. Some of the page protectors are top loading and I had a few that I purchased many years ago that are side loading and I love those for items that need replacing often; for example the kids weekly and monthly school newsletters, the weekly dinner menu template, grocery sales mailings, etc. The top loading page protectors house papers that I don't change very often. And page dividers for separating sections in the notebook.
 
I had some scrapbook paper which I cut to size and added a monogram on the front. 

 
I used the same paper to add a strip down the side and added the words "Family Notebook" with American Crafts foam Thickers. 

My first insert is one that I wanted to be able to get to easily. It is my coupon holder, a simple pencil holder.

My first divider is one labeled "General Info". This one has a lot of information in it. Some of it I am not going to share the template because of the personal information on it, but it has the names of our neighbors, family contacts, business contacts, emergency contacts, etc. The contact page is great for accessing numbers quickly.
 
 
Other information located in the "General Info" tab is our weekly schedule routine. I wanted to add this information because if for some reason I am not able to be here to care for my children, say an appointment or my husband and I went on vacation without the kids then whoever is watching them would know our routine if they aren't already familiar with it. Usually that is not the case, the grandparents are pretty darn good and know everything already but I like to cover my bases.
This information is very detailed.


Next page protector includes the local YMCA schedule.
 
The next page protector includes a template that I use to list out our weekly meal plan, I love this template and it works great for me, it is from Ali Edwards Blog.
 
Next up is my Costco savings flier, love that place! I keep this flier in the page protector that opens on the side.
 
Then I have the Whole Foods savings magazine, it is also in the protector that opens on the side.


Next up, is the Pantry Item list, this is just a simple chart I did one afternoon that lists some of the items in our pantry that I put into other containers or remove from the original packaging. This chart allows me to keep track of expiration dates and Lot numbers, this is helpful to keep track of expired foods and just in case any items are recalled. I use a pencil to write on this form, when the item runs out and I purchase new items I can just erase and put in the correct numbers.
 
Then I have inserted a Valuation Guide for Goodwill Donations, instead of having to look this stuff up, I just printed it out and included it in my notebook. This is helpful when having a yard sale or donating items to your local thrift shop.

 
The next divider is for our oldest child. This section holds his weekly classroom newsletter, the monthly lunch menu, the Box Top for Education form (this form has spaces to tape the box tops on the form to return to the school) and all of those forms are in the side loading page protectors because these forms get updated often. Other forms in the section were letters from school pertaining to art supplies needed during the year, the grade handbook and the grade level supply list.
 
The next divider is for our youngest child. This section has the monthly school newsletter which is in a side load divider, for easy updating. The other pages in this section include the school handbook, supply list for the school, general school information handout and also a recipe for play dough (the school request parents to make a batch or 2 during the school year for the class).
 
The next divider is the Maintenance/Clean section. This section includes my cleaning list which is broken down into weekly, monthly and seasonally cleaning. I also included a spreadsheet that I made which breaks down items that we do around the house just as maintenance, but it is always hard to remember when those chores were completed, so this is one way to keep track of that. The chores listed are flipping the mattresses, cleaning windows/blinds, cleaning the deck, etc.
 
The next divider is Helpful Tips/Info. This section includes stuff I find on the Internet and tips out of magazines, articles on how to freeze herbs, what food freezes best, food dyes to avoid, laundry tips, etc.

 
The last divider is Take Out Menus. This section keeps all of our favorite menus organized. And again the menus are in the side load page protectors for easy removal and return.
 
I feel like I will continue to add to this notebook, there are a few items that I have just recently found on Martha Stewart's website that I may add, she has checklist galore and many are very helpful. I am also sure that I will also change the items in the book down the road, I mean our lives change so much so as would our notebook. This works for me right now but this is something that anyone could make for themselves. I must say that it is so nice to have all this information in one spot, no more papers or checklist laying around!